React is a great library and can make developing web apps much easier.
However, the first thing that anyone coming from Angular sees is the lack of two way binding by default. It is one of the reason why some developers don’t want to try it.
Even though two way binding is a cool feature, it is not actually needed by most applications. Yet, there are cases when it can be really useful.
Today, I will show you one such real life application which I use almost daily. Without two way binding this app will be a nightmare to develop.
Invoices
Our app is named Invoices. It is an internal application, which as the name should suggest is for creating invoices.
When I initially created the app I had a few requirements. It had to be easy to write and host, and it had to take me very little time to develop.
Before, I either used some proprietary software or I used Excel spreadsheets. This was not only time consuming but had way too many limitations.
Here is my initial stack. I used Angular to write the app and I only had static files. All my files were on S3. All the data was stored in Parse. Parse is also used to manage user access.
My new stack is the same, but instead of Angular I am now using React.
Here is what a screenshot of the invoice editing screen looks like (this is a real invoice with just a few changes on potentially sensitive data)
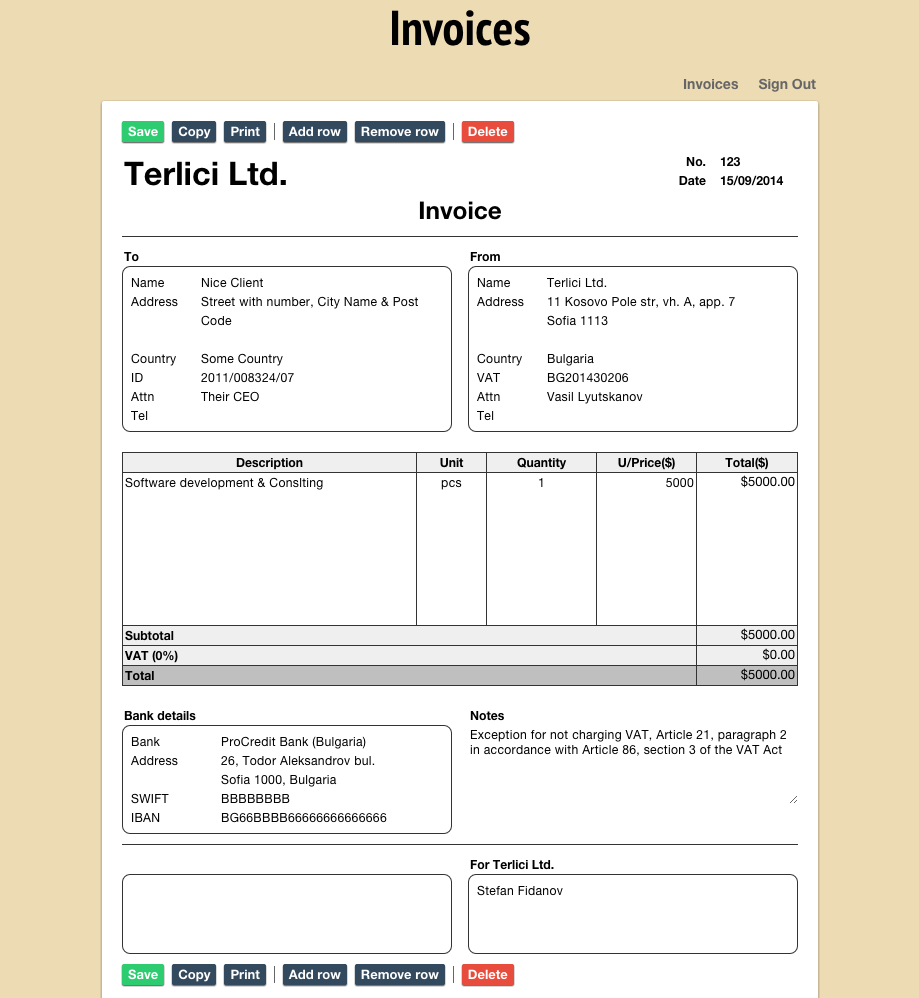
Everything in the white, paper-like, box is editable, with the exception of the buttons. Even the labels, like Total and Subtotal, are editable as well as their values on the right of them.
If you change the quantity or the price per unit all other amounts will be updated, too. When you change the VAT percentage in the parentheses next to the VAT word, the amount of VAT on the right will be automatically calculated.
We issue invoices in both English and Bulgarian, so we need to be flexible and to be able to modify every piece of information.
On this very page, there are 96 places where a change can occur. We absolutely need two way binding. Or there will be so much repeating work.
However, simple two way binding will not work for two reasons.
First, we have a Parse object for our invoice, which is essentially a Backbone model with set and get methods when you access properties.
Second, we have many deep nested keys like invoice.get(‘products’).rows[0].name
valueLink and checkedLink
React is great for many reasons, and one of them is that there is an elegant solution to this case.
Every input element, which is not a checkbox, has a valueLink property, and checkboxes have the checkedLink property which is basically the same.
Let’s have a look at valueLink. What is it and why is it so special?
<input type="text" valueLink={ some_object } />valueLink accepts a simple object which has two properties: value and requestChange.
The value property is the initial value of the input element when the page is loaded.
The requestChange method is a function with one argument. It will be called each time the value of the input element changes after user interaction. The supplied argument will be the new updated value.
Simple two way binding
Here is how a valueLink object will look like for a simple two way binding.
var valueLink = {
  value: this.state.key,
  requestChange: function(newValue) {
    this.setState({key: newValue})
  }.bind(this)
}
It’s very simple solution. No magic.
Advanced two way binding
There is only one problem with the solution above. It has a specific default value and it only works for a specific key.
Our next step is to create a method which can generate valueLink objects for all kind of default values and keys. Let’s see how this can be done
var InvoiceEdit = React.createClass({

  linkWithState: function(key) {
    return {
      value: this.state[key],
      requestChange: function(newValue) {
        this.setState({key: newValue})
      }.bind(this)
    }
  },

})
This simple method returns an object very simpler to the one you just saw. However, it can generate a valueLink object for any key, and then this valueLink object can be used to accomplish two way binding.
We will see in a minute how exactly we are going to use it.
There is just one last problem with the solution above. It works only with simple keys inside the React component state.
Let me show you what we really use in our Invoice app. It is almost identical to what you just saw.
var InvoiceEdit = React.createClass({
  getValue: function(key) {
    return key.split(".").reduce(function(previous, current, i) {
      if (i === 0) return this.state.invoice.get(current)
      else return previous[current]
    }.bind(this), "")
  },

  setValue: function(key, value) {
    key.split(".").reduce(function(previous, current, i, keys) {
      if (keys.length === 1) this.state.invoice.set(current, value)
      else if (i === 0) return this.state.invoice.get(current)
      else if (keys.length - 1 === i) previous[current] = value
      else return previous[current]
    }.bind(this), "")

    this.setState({invoice: this.state.invoice})
  },

  linkWithState: function(key) {
    return {
      value: this.getValue(key),
      requestChange: function(value) {
        this.setValue(key, value)
      }.bind(this)
    }
  },

  render: function() {
    return (
      <section>
        <header>
          <input type="text" valueLink={ this.linkWithState("title") } />

          <div>
            <div>
              <input type="text" valueLink={ this.linkWithState("number.label") } />
              <input type="text" valueLink={ this.linkWithState("number.value") }/>
            </div>

            <div>
              <input type="text" valueLink={ this.linkWithState("date.label") } />
              <input type="text" valueLink={ this.linkWithState("date.value") } />
            </div>
          </div>
        </header>
      </section>
    )
  },
})
This is only an excerpt of the code, because it has 96 fields to take care of where as here I am only showing you 5 of them.
linkWithState looks almost like before, but instead of reading and setting values from the component state it uses two helper methods getValue and setValue.
By abstracting those two methods, you will be able to create two way binding between your component and any kind of data. Even if you need asynchronous access.
In this specific case, we are reading and writing data to this.state.invoice which is as I told you is a model from Parse and identical to any Backbone model.
Our implementation of getValue and setValue can work with deep keys in the form of deep.level.key.
Of course after setValue changes, it uses setState to notify the react component about it.
Also above you can see the following
<input type="text" valueLink={ this.linkWithState("date.label") } />This one line shows you everything you need to know to create two way binding. You just have to let know the field which key from your data it should bind to.
As you can see once we have our three helper function linkWithState, setValue and getValue, then it is easy to use two way binding for as many fields as you like. In our case 96 of them.
Next
You may not always need two way binding, but when you need it React has your back.
Try this solution and you can experiment with what kind of data you can do two way binding.