
Dealing with images and other media is integral part of almost every app in the wild. It begins with choosing among the thousands of images and other media that you have.
However, adding your own gallery to your Android app to fulfil this essential function is nontrivial.
Nontrivial it is but it is also doable. You just have to follow the steps below.
- Ask for the user’s permission, both in manifest & runtime
- Fetch the user’s images and videos, but beware there might be thousands
- Display the fetched data efficiently with RecyclerView
This is the base for any media gallery, on which you can expand and develop as much as you need or like.
Step 0
I am going to use a Fragment in these examples, but using an Activity is almost identical.
Let’s first look at the empty fragment. Nothing special.
public class GalleryFragment extends Fragment {

    private FragmentGalleryBinding binding;
    private GalleryViewModel viewModel;

    @Override
    public View onCreateView(@NonNull LayoutInflater inflater, @Nullable ViewGroup container, @Nullable Bundle savedInstanceState) {
        binding = FragmentGalleryBinding.inflate(inflater, container, false);
        return binding.getRoot();
    }

    @Override
    public void onViewCreated(@NonNull View view, @Nullable Bundle savedInstanceState) {
        super.onViewCreated(view, savedInstanceState);
        viewModel = new ViewModelProvider(this).get(GalleryViewModel.class);
    }

    @Override
    public void onDestroyView() {
        super.onDestroyView();
        binding = null;
    }
}
FragmentGalleryBinding is autogenerated from its layout, which you will see later, thanks to View binding
Permissions
As you might guess pictures and videos are senstive information. You don’t get to access them just like that. You have to ask first.
The manifest
At the root level of your manifest you will need to have the following 3 permissions
<?xml version="1.0" encoding="utf-8"?>
<manifest xmlns:android="http://schemas.android.com/apk/res/android"
    xmlns:tools="http://schemas.android.com/tools">

    <uses-permission android:name="android.permission.READ_MEDIA_IMAGES" />
    <uses-permission android:name="android.permission.READ_MEDIA_VIDEO" />
    <uses-permission android:name="android.permission.READ_EXTERNAL_STORAGE" />
At runtime
The manifest is not enough. You also have to ask for permission during runtime. The best time will be righ after the user opens the gallery. It will make it clear what and why you are asking.
The following update of the GalleryFragment does just that.
public class GalleryFragment extends Fragment {

    private final ActivityResultLauncher<String[]> requestPermissionsLauncher = registerForActivityResult(new ActivityResultContracts.RequestMultiplePermissions(), isGranted -> {
        boolean allGranted = true;
        for (Boolean permissionGranted : isGranted.values()) {
            allGranted = allGranted & permissionGranted;
        }

        if (allGranted) {
            load();
        } else {
            notifyMissingPermissions();
        }
    });

    private FragmentGalleryBinding binding;
    private GalleryViewModel viewModel;

    @Override
    public View onCreateView(@NonNull LayoutInflater inflater, @Nullable ViewGroup container, @Nullable Bundle savedInstanceState) {
        binding = FragmentGalleryBinding.inflate(inflater, container, false);
        return binding.getRoot();
    }

    @Override
    public void onViewCreated(@NonNull View view, @Nullable Bundle savedInstanceState) {
        super.onViewCreated(view, savedInstanceState);
        viewModel = new ViewModelProvider(this).get(GalleryViewModel.class);

        requestPermissions();
    }

    @Override
    public void onDestroyView() {
        super.onDestroyView();
        binding = null;
    }

    private void requestPermissions() {
        ArrayList<String> missingPermissions = new ArrayList<>(4);

        if (Build.VERSION.SDK_INT >= 33) {
            if (ContextCompat.checkSelfPermission(requireContext(), Manifest.permission.READ_MEDIA_IMAGES) != PackageManager.PERMISSION_GRANTED) {
                missingPermissions.add(Manifest.permission.READ_MEDIA_IMAGES);
            }

            if (ContextCompat.checkSelfPermission(requireContext(), Manifest.permission.READ_MEDIA_VIDEO) != PackageManager.PERMISSION_GRANTED) {
                missingPermissions.add(Manifest.permission.READ_MEDIA_VIDEO);
            }
        } else {
            if (ContextCompat.checkSelfPermission(requireContext(), Manifest.permission.READ_EXTERNAL_STORAGE) != PackageManager.PERMISSION_GRANTED) {
                missingPermissions.add(Manifest.permission.READ_EXTERNAL_STORAGE);
            }
        }

        if (missingPermissions.size() > 0) {
            requestPermissionsLauncher.launch(missingPermissions.toArray(new String[0]));
        } else {
            load();
        }
    }

    private void notifyMissingPermissions() {
        new AlertDialog.Builder(requireContext())
                .setTitle(R.string.gallery_missing_permissions_title)
                .setMessage(R.string.gallery_missing_permissions_message)
                .setPositiveButton(android.R.string.ok, (dialog, id) -> {
                })
                .show();
    }

    private void load() {
        // TODO: see below
    }
}
The first interesting bit is the ActivityResultLauncher.
private final ActivityResultLauncher<String[]> requestPermissionsLauncher = registerForActivityResult(new ActivityResultContracts.RequestMultiplePermissions(), isGranted -> {
    boolean allGranted = true;
    for (Boolean permissionGranted : isGranted.values()) {
        allGranted = allGranted & permissionGranted;
    }

    if (allGranted) {
        load();
    } else {
        notifyMissingPermissions();
    }
});
This launcher will show a dialog asking for the permissions. It is automatically generated by the Android system.
Depending on whether the user grants them either the data will be loaded or we will notify the user that the gallery cannot work without those permissions.
Before requesting permissions we have to check what we already have been granted.
private void requestPermissions() {
    ArrayList<String> missingPermissions = new ArrayList<>(4);

    if (Build.VERSION.SDK_INT >= 33) {
        if (ContextCompat.checkSelfPermission(requireContext(), Manifest.permission.READ_MEDIA_IMAGES) != PackageManager.PERMISSION_GRANTED) {
            missingPermissions.add(Manifest.permission.READ_MEDIA_IMAGES);
        }

        if (ContextCompat.checkSelfPermission(requireContext(), Manifest.permission.READ_MEDIA_VIDEO) != PackageManager.PERMISSION_GRANTED) {
            missingPermissions.add(Manifest.permission.READ_MEDIA_VIDEO);
        }
    } else {
        if (ContextCompat.checkSelfPermission(requireContext(), Manifest.permission.READ_EXTERNAL_STORAGE) != PackageManager.PERMISSION_GRANTED) {
            missingPermissions.add(Manifest.permission.READ_EXTERNAL_STORAGE);
        }
    }

    if (missingPermissions.size() > 0) {
        requestPermissionsLauncher.launch(missingPermissions.toArray(new String[0]));
    } else {
        load();
    }
}
Depending on the version of Android, different permissions are required. We check whether they are already granted. If they do we load the data, otherwise we use the launcher to ask for them.
Now that the permissions are properly handled, let’s get those images (and videos).
Getting the images, page by page
Turns out people love taking pictures and videos. Who knew. Some have thousands, some tens of thousands. If you try to load them all at once, in your gallery, your app will be very, very slow.
Of course, you are going to use RecyclerView to be efficient on the UI side but this is not enough. You have to be efficient when fetching the images data, too.
When the user opens the gallery it might be better to load the data for only 100 pictures. You don’t need immediately the data for all of their 10,000 pictures and videos (only new stuff first).
This is where pagination comes into play. It is a technique of getting the data page by page. As a result your app is not overwhelmed and feels snappy.
We are going to use PagingSource to help us with that.
Before that let’s have a quick look at the helper class which will hold the details for a single item from your gallery.
public class GalleryItem {
    public final long id;
    public final Uri uri;
    public final int type;
    public final long date;
    public final long duration;

    public GalleryItem(long id, Uri uri, int type, long date, long duration) {
        this.id = id;
        this.uri = uri;
        this.type = type;
        this.date = date;
        this.duration = duration;
    }

    @Override
    public int hashCode() {
        return Objects.hash(id, type);
    }

    @Override
    public boolean equals(@Nullable Object obj) {
        if (this == obj) return true;
        if (obj == null || getClass() != obj.getClass()) return false;
        GalleryItem galleryItem = (GalleryItem) obj;
        return id == galleryItem.id && type == galleryItem.type;
    }
}
It has everything you will ever need. How do we produce the pages with the PagingSource?
public class GalleryPagingSource extends PagingSource<Long, GalleryItem> {

    private static final String SELECTION = MediaStore.Files.FileColumns.MEDIA_TYPE + " IN ('" +
            MediaStore.Files.FileColumns.MEDIA_TYPE_IMAGE + "', '" +
            MediaStore.Files.FileColumns.MEDIA_TYPE_VIDEO + "') AND " +
            MediaStore.Files.FileColumns.MIME_TYPE + " NOT IN ('image/svg+xml')";
    private static final String[] PROJECTION = new String[] {
            MediaStore.Files.FileColumns._ID,
            MediaStore.Files.FileColumns.MEDIA_TYPE,
            MediaStore.Files.FileColumns.DATE_ADDED,
            MediaStore.Files.FileColumns.DURATION,
    };

    final private ContentResolver contentResolver;

    public GalleryPagingSource(ContentResolver contentResolver) {
        this.contentResolver = contentResolver;
    }

    @Nullable
    @Override
    public Long getRefreshKey(@NonNull PagingState<Long, GalleryItem> state) {
        Integer position = state.getAnchorPosition();
        if (position == null) {
            return null;
        }

        GalleryItem item = state.closestItemToPosition(position);
        if (item == null) {
            return null;
        }

        return item.id;
    }

    @Nullable
    @Override
    public Object load(@NonNull LoadParams<Long> params, @NonNull Continuation<? super LoadResult<Long, GalleryItem>> continuation) {
        List<GalleryItem> items = new ArrayList<>();
        Long prevKey = params.getKey();

        try (final Cursor cursor = getCursor(prevKey, params.getLoadSize())) {
            if (cursor != null) {
                while (cursor.moveToNext()) {
                    long id = cursor.getLong(0);
                    int type = cursor.getInt(1);
                    long duration = type == MediaStore.Files.FileColumns.MEDIA_TYPE_VIDEO ? cursor.getLong(3) : 0;
                    long date = cursor.getLong(2);

                    Uri uri = ContentUris.withAppendedId(MediaStore.Files.getContentUri(MediaStore.VOLUME_EXTERNAL), id);

                    items.add(new GalleryItem(id, uri, type, date, duration));
                }
            }
        } catch (SecurityException e) {
            Log.w("GalleryPagingSource", e);
            return new LoadResult.Error<Long, GalleryItem>(e);
        }

        Long nextKey = items.size() > 0 ? items.get(items.size() - 1).id : null;
        return new LoadResult.Page<>(items, prevKey, nextKey);
    }

    private Cursor getCursor(Long start, int size) {
        String selection = SELECTION + (start == null ? "" : (" AND _id < " + start));
        Uri uri = MediaStore.Files.getContentUri(MediaStore.VOLUME_EXTERNAL);

        if (Build.VERSION.SDK_INT >= 30) {
            // LIMIT works differently since API 30
            Bundle queryArgs = new Bundle();
            queryArgs.putString(ContentResolver.QUERY_ARG_SQL_SELECTION, selection);
            queryArgs.putString(ContentResolver.QUERY_ARG_SQL_SORT_ORDER, "_id DESC");
            queryArgs.putString(ContentResolver.QUERY_ARG_SQL_LIMIT, Integer.toString(size));

            return contentResolver.query(uri, PROJECTION, queryArgs, null);
        } else {
            return contentResolver.query(uri, PROJECTION, selection, null, "_id DESC LIMIT " + size, null);
        }
    }
}
GalleryPagingSource receives a ContentResolver and then queries it just like any other data source, with a coursor.
Everytime load is called we know how many items are requested and where to start looking for the next item.
It’s not that complicated.
Providng this information to your UI, to the fragment, is even simpler. The GalleryViewModel is just a few lines of code.
public class GalleryViewModel extends AndroidViewModel {

    private static final int PAGE_SIZE = 128;
    public final LiveData<PagingData<GalleryItem>> mediaLiveData;

    public GalleryViewModel(@NonNull Application application) {
        super(application);

        Pager<Long, GalleryItem> pager = new Pager<>(new PagingConfig(PAGE_SIZE), () ->
                new GalleryPagingSource(getApplication().getContentResolver()));

        mediaLiveData = PagingLiveData.getLiveData(pager);
    }
}
The helper classes Pager and PagingLiveData turn the GalleryPagingSource into a useful LiveData which is easily observed.
What’s more no data is actually fetched until someone subscribes and begins observing.
UI
We have the permission, we have data, let’s show the gallery. We want to be efficient so
we are going to use a RecyclerView. We don’t need a complicated layout.
<?xml version="1.0" encoding="utf-8"?>
<FrameLayout xmlns:android="http://schemas.android.com/apk/res/android"
    xmlns:tools="http://schemas.android.com/tools"
    android:layout_width="match_parent"
    android:layout_height="match_parent"
    tools:context=".gallery.GalleryFragment">

    <androidx.recyclerview.widget.RecyclerView
        android:id="@+id/gallery"
        android:layout_width="match_parent"
        android:layout_height="match_parent"
        />

</FrameLayout>
Nothing special. Just an old RecyclerView.
Every item in the gallery also needs a layout. Just the image for now.
<?xml version="1.0" encoding="utf-8"?>
<androidx.constraintlayout.widget.ConstraintLayout xmlns:android="http://schemas.android.com/apk/res/android"
    xmlns:tools="http://schemas.android.com/tools"
    android:layout_width="match_parent"
    android:layout_height="wrap_content"
    xmlns:app="http://schemas.android.com/apk/res-auto">

    <ImageView
        android:id="@+id/thumbnail"
        android:layout_width="0dp"
        android:layout_height="0dp"
        app:layout_constraintDimensionRatio="H,1:1"
        app:layout_constraintRight_toRightOf="parent"
        app:layout_constraintLeft_toLeftOf="parent"
        app:layout_constraintTop_toTopOf="parent"
        android:scaleType="centerCrop"
        tools:ignore="ContentDescription" />

</androidx.constraintlayout.widget.ConstraintLayout>
By using ConstraintLayout and then app:layout_constraintDimensionRatio="H,1:1"
we get nice square images with very little work (perfect).
Every view in the RecyclerView needs a ViewHolder.
private static class GalleryViewHolder extends RecyclerView.ViewHolder {
    private final GalleryItemBinding binding;

    public GalleryViewHolder(@NonNull GalleryItemBinding binding) {
        super(binding.getRoot());
        this.binding = binding;
    }

    public void bind(@NonNull GalleryItem item, @NonNull View.OnClickListener onClickListener) {
        binding.thumbnail.setOnClickListener(onClickListener);
        Glide.with(itemView)
                .load(item.uri)
                .into(binding.thumbnail);
    }
}
When binding a gallery item to a view holder, we are using the popular Glide library for fast and efficient image loading. Just a few lines of code.
There is also an OnClickListener to handle the item selection.
Next, RecyclerView needs an adapter to create those views and view holders.
private static class GalleryAdapter extends PagingDataAdapter<GalleryItem, GalleryViewHolder> {
    private final GalleryOnClickListener onClickListener;

    public GalleryAdapter(@NonNull GalleryOnClickListener onClickListener) {
        super(new DiffUtil.ItemCallback<GalleryItem>() {
            @Override
            public boolean areItemsTheSame(@NonNull GalleryItem oldItem, @NonNull GalleryItem newItem) {
                return oldItem.id == newItem.id;
            }

            @Override
            public boolean areContentsTheSame(@NonNull GalleryItem oldItem, @NonNull GalleryItem newItem) {
                return oldItem.equals(newItem);
            }
        });

        this.onClickListener = onClickListener;
    }

    @NonNull
    @Override
    public GalleryViewHolder onCreateViewHolder(@NonNull ViewGroup parent, int viewType) {
        GalleryItemBinding binding = GalleryItemBinding.inflate(LayoutInflater.from(parent.getContext()), parent, false);
        return new GalleryViewHolder(binding);
    }

    @Override
    public void onBindViewHolder(@NonNull GalleryViewHolder holder, int position) {
        GalleryItem item = getItem(position);

        if (item != null) {
            holder.bind(item, (v) -> onClickListener.onClick(item, position));
        }
    }
}
Nothing special, just creates view holders and binds data to them. It doesn’t get any simpler than this.
We are also using the following interface to handle clicks on an item in the gallery.
private interface GalleryOnClickListener {
    void onClick(@NonNull GalleryItem item, int position);
}
By default RecyclerView doesn’t really know how to display any item, only how to handle them.
The next line changes that. The gallery will be displayed as a grid.
Let’s add the following to onViewCreated
binding.gallery.setLayoutManager(new GridLayoutManager(requireContext(), 4));
Our gallery will be a nice grid with four columns.
Let’s load the data in our empty load method. It is called only after the user has given us the permission
to access its media items.
private void load() {
    GalleryAdapter adapter = new GalleryAdapter((item, position) -> {
        Snackbar.make(binding.gallery, "Clicked on item " + position, Snackbar.LENGTH_LONG)
                .setAnchorView(binding.gallery)
                .setAction("Action", null).show();
    });
    binding.gallery.setAdapter(adapter);

    viewModel.mediaLiveData.observe(getViewLifecycleOwner(), data ->
        adapter.submitData(getLifecycle(), data)
    );
}
Only after we add that observer, the media data is actually fetched (lazy loading).
We are almost complete with this first basic version of the gallery. All the images are displayed in a grid. You can scroll up and down. Everything is requested and loaded on the fly efficiently.
However, we can improve a little bit the way the gallery looks.
Improvement
In the gallery the images are shown next to each other. No space between them. It doesn’t look very nice. We can fix it. Let’s add some space but only in between images, and no space near the screen borders.
in onViewCreated we are going to add the following line.
binding.gallery.addItemDecoration(new GalleryItemSpacingDecoration(10, 4));
this doesn’t tell us much. Let’s have a look at how GalleryItemSpacingDecoration actually adds spacing around items.
public static class GalleryItemSpacingDecoration extends RecyclerView.ItemDecoration {
    private final int spacing;
    private final int columnsCount;

    public GalleryItemSpacingDecoration(int spacing, int columnsCount) {
        this.spacing = spacing;
        this.columnsCount = columnsCount;
    }

    @Override
    public void getItemOffsets(@NonNull Rect outRect, @NonNull View view, @NonNull RecyclerView parent, @NonNull RecyclerView.State state) {
        int position = parent.getChildAdapterPosition(view);
        int column = position % columnsCount;

        outRect.bottom = spacing;
        outRect.left = column * spacing / columnsCount;
        outRect.right = spacing - (column + 1) * spacing / columnsCount;
    }
}
The end result is equal spacing between columns and no spacing on the side.
Result & Next
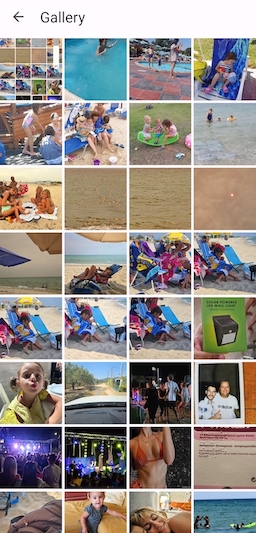
We have a nice little gallery which you can integrate into your app. Take the code and use it as a base to build something beautiful.
In the next article I will show you how to add multiple selection, animations, video indicators and more.
You can find all the code on GitHub too.