
Almost every application needs a way for the user to select an image or a video. I already showed you how to do this on Android. This time I will show you how to do it on iOS, so that you can add a gallery to your iPhone or iPad app.
It is nontrivial to add a gallery but it is essential (and I know that you can do it)
There are several steps that you need to take.
- Ask for the user’s permission, both in info.plist & runtime
- Fetch the user’s images and videos, but beware there might be thousands
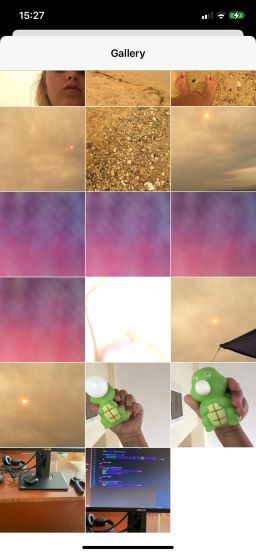
- Display the fetched data efficiently with UICollectionView
Step 0
Let’s begin with a basic view controller.
class GalleryViewController : UIViewController {
    func withNavigationController() -> UIViewController {
        return UINavigationController(rootViewController: self)
    }

    override func viewDidLoad() {
        super.viewDidLoad()

        title = "Gallery"
        view.backgroundColor = .white
    }
}
We will add more to it as we go.
Permissions
There are two places where you need to handle media access permissions for your iOS app. First, you have to update your info.plist and then ask for them at runtime.
Info
Open your project in Xcode and go into the top left bar and click on the project file (the one on the top with the blue icon). On the right side, above the content, there are tabs. One of them is Info.
You will see multiple rows each having a key and a value. Add one more with the key NSPhotoLibraryUsageDescription and
set something like Shows the user photos to upload for its value.
Runtime
When the user opens the gallery, it is the right time to ask for permission to access their photos and videos.
private func requestAccess(completion: @escaping () -> Void) {
    let status: PHAuthorizationStatus
    if #available(iOS 14, *) {
        status = PHPhotoLibrary.authorizationStatus(for: .readWrite)
    } else {
        status = PHPhotoLibrary.authorizationStatus()
    }

    switch(status) {
    case .notDetermined:
        PHPhotoLibrary.requestAuthorization { status in
            DispatchQueue.main.async {
                switch (status) {
                case .denied, .restricted, .notDetermined:
                    self.notifyAccessDenied()
                default:
                    completion()
                }
            }
        }
    case .denied, .restricted:
        notifyAccessDenied()
    default:
        completion()
    }
}
requestAccess accepts closure and calls it only if the user grants permission to see their pictures.
It might be a full permission or, since iOS 14, a limited permission (only pictures chosen by the user).
First, we check whether we already have the permission and only ask for it if it is not determined.
notifyAccessDenied is also a very useful function.
private func notifyAccessDenied() {
    let alert = UIAlertController(title: "Unable to access photos", message: "Please update permissions from Settings", preferredStyle: .alert)
    alert.addAction(UIAlertAction(title: "Settings", style: .default, handler: { _ in
        if let url = URL(string: UIApplication.openSettingsURLString) {
            UIApplication.shared.open(url)
        }
    }))
    alert.addAction(UIAlertAction(title: "OK", style: .default))

    present(alert, animated: true)
}
It not only tells the user that access to photos is required for the gallery to function but also points the user to the settings where they can grant us access.
Getting the data
After the user has granted us access to their photo library, we have to load the images
private var media: PHFetchResult<PHAsset>?

private func load() {
    requestAccess { [weak self] in
        guard let self = self else { return }

        DispatchQueue.global(qos: .userInitiated).async { [weak self] in
            guard let self = self else { return }

            let result: PHFetchResult<PHAsset>
            let recentAlbum = PHAssetCollection.fetchAssetCollections(with: .smartAlbum, subtype: .smartAlbumUserLibrary, options: nil).firstObject

            if let album = recentAlbum {
                result = PHAsset.fetchAssets(in: album, options: nil)
            } else {
                result = PHAsset.fetchAssets(with: nil)
            }

            DispatchQueue.main.async {
                self.media = result
                // TODO: display images
            }
        }
    }
}
In the requestAccess closure we use DispatchQueue.global(qos: .userInitiated).async to fetch
the media library on a background queue. This can be a slow operation and we don’t want it on the UI/main thread.
We want the recent album because it is the way people expect to see their photos. This is the default way when they open the Photos app.
In case that doesn’t work, we get the images from the photo lib with its default ordering which is a little bit different.
Finally on the main thread we update the UI with the data that we just got.
The UI
UICollectionView is the way to go because it can efficiently display the grid.
First, we will add the following at the top of the controller.
private lazy var collectionView: UICollectionView = {
    let layout = UICollectionViewFlowLayout()
    layout.minimumInteritemSpacing = 0
    layout.minimumLineSpacing = 0

    let collectionView = UICollectionView(frame: view.frame, collectionViewLayout: layout)
    collectionView.translatesAutoresizingMaskIntoConstraints = false
    collectionView.register(GalleryViewCell.self, forCellWithReuseIdentifier: GalleryViewCell.reuseIdentifier)
    collectionView.delegate = self
    collectionView.dataSource = self

    return collectionView
}()
collectionView as a lazy loaded variable. We are going to use the flow layout to create a grid out of it.
The delegate and datasource properties tell UICollectionView how to handle clicks and how to display the data.
We also register GalleryViewCell with the UICollectionView to display the cells.
class GalleryViewCell : UICollectionViewCell {
    static var reuseIdentifier: String {
        return String(describing: GalleryViewCell.self)
    }

    var imageRequestID: PHImageRequestID?

    private var currentConstraints = [NSLayoutConstraint]()

    private lazy var imageView: UIImageView = {
        let image = UIImageView()
        image.translatesAutoresizingMaskIntoConstraints = false
        image.contentMode = .scaleAspectFill
        image.clipsToBounds = true

        return image
    }()

    override init(frame: CGRect) {
        super.init(frame: frame)

        contentView.addSubview(imageView)
        contentView.clipsToBounds = true
    }

    required init?(coder: NSCoder) {
        fatalError("init(coder:) has not been implemented")
    }

    func setup(with image: UIImage?, at indexPath: IndexPath) {
        let (bottomSpace, leadingSpace, trailingSpace) = computeSpace(at: indexPath)

        NSLayoutConstraint.deactivate(currentConstraints)

        currentConstraints = [
            imageView.topAnchor.constraint(equalTo: contentView.topAnchor),
            imageView.leadingAnchor.constraint(equalTo: contentView.leadingAnchor, constant: leadingSpace),
            imageView.trailingAnchor.constraint(equalTo: contentView.trailingAnchor, constant: -trailingSpace),
            imageView.bottomAnchor.constraint(equalTo: contentView.bottomAnchor, constant: -bottomSpace),
        ]

        NSLayoutConstraint.activate(currentConstraints)

        imageView.image = image
    }

    private func computeSpace(at indexPath: IndexPath) -> (CGFloat, CGFloat, CGFloat) {
        let spacing = CGFloat(1)
        let column = CGFloat(indexPath.row % 3)
        let columnCount = CGFloat(3)

        return (spacing, column * spacing / columnCount, spacing - ((column + 1) * spacing / columnCount))
    }
}
imageRequestID will keep track which is the request loading the image into this cell. This might not be very clear
right now but it will be below.
The rest is rather standard, except for computeSpace.
Without it images will have no spacing between them. This doesn’t look very nice.
In my case I want no spacing near the border but I want spacing between images.
This is what computeSpace does.
We also have to tell to UICollectionViewFlowLayout the actual size of every cell.
extension GalleryViewController: UICollectionViewDelegateFlowLayout {
    func collectionView(_ collectionView: UICollectionView, layout collectionViewLayout: UICollectionViewLayout, sizeForItemAt indexPath: IndexPath) -> CGSize {
        let size = UIScreen.main.bounds.width * 0.3333
        return CGSize(width: size, height: size)
    }

    func collectionView(_ collectionView: UICollectionView, layout collectionViewLayout: UICollectionViewLayout, minimumInteritemSpacingForSectionAt section: Int) -> CGFloat {
        return 0
    }
}
Implementing UICollectionViewDelegateFlowLayout computes the size of every cell.
We want them to be square and to have three columns in the grid.
The looks of the grid are done, next is loading the data into the each cell.
class GalleryViewController : UIViewController {
    private let thumbnailFetchSize = CGSize(width: 256, height: 256)

    ...
}

extension GalleryViewController: UICollectionViewDataSource {

    func numberOfSections(in collectionView: UICollectionView) -> Int {
        return 1
    }

    func collectionView(_ collectionView: UICollectionView, numberOfItemsInSection section: Int) -> Int {
        return media?.count ?? 0
    }

    func collectionView(_ collectionView: UICollectionView, cellForItemAt indexPath: IndexPath) -> UICollectionViewCell {
        let cell = collectionView.dequeueReusableCell(withReuseIdentifier: GalleryViewCell.reuseIdentifier, for: indexPath)

        if let cell = cell as? GalleryViewCell, let asset = media?[indexPath.row] {
            if let imageRequestID = cell.imageRequestID {
                PHImageManager.default().cancelImageRequest(imageRequestID)
            }

            let options = PHImageRequestOptions()
            options.isNetworkAccessAllowed = true

            cell.imageRequestID = PHImageManager.default().requestImage(for: asset, targetSize: thumbnailFetchSize, contentMode: .aspectFill, options: options) { image, _ in
                cell.imageRequestID = nil
                cell.setup(with: image, at: indexPath)
            }
        }

        return cell
    }
}
thumbnailFetchSize is the size we want to fetch thumbnails. We don’t want them full size but smaller
otherwise it will take a lot of time and memory to load them.
options.isNetworkAccessAllowed = true is required to display photos made on other devices as your iPad or your old iPhone.
As I told you earlier imageRequestID is important because it ensures that there is only one loading operation per cell.
Handling clicks on gallery items is another critical part, thankfully very easy to implement.
extension GalleryViewController: UICollectionViewDelegate {
    func collectionView(_ collectionView: UICollectionView, didSelectItemAt indexPath: IndexPath) {
        print("didSelectItemAt", indexPath)
    }
}
Nothing fancy. You can plug-in your code here.
Finally let’s connect the display and the data loading.
private func load() {
    ...
            DispatchQueue.main.async {
                self.media = result
                self.collectionView.reloadData()
                self.collectionView.scrollToItem(at: IndexPath(row: max(result.count - 1, 0), section: 0), at: .bottom, animated: false)
            }

    ....
}
First, we save the data. Then we ask the collectionView to reload. At the end we scroll to the very bottom.
The latter is done because this is the expected way photos are prestented on iOS. In the Photos App you are at the bottom and you see the most recent media. We just do the same.
The load method should be called very early. This way permission and media are handled as soon as the gallery is open.
override func viewDidLoad() {
    super.viewDidLoad()

    title = "Gallery"
    view.backgroundColor = .white

    view.addSubview(collectionView)

    NSLayoutConstraint.activate([
        collectionView.topAnchor.constraint(equalTo: view.safeAreaLayoutGuide.topAnchor),
        collectionView.bottomAnchor.constraint(equalTo: view.bottomAnchor),
        collectionView.leadingAnchor.constraint(equalTo: view.leadingAnchor),
        collectionView.trailingAnchor.constraint(equalTo: view.trailingAnchor),
    ])

    load()
}
Always be fresh
We are almost done. The gallery is working but we can improve it just a tiny little bit. It would be nice if as soon as a new image is available that it shows in the gallery. We can observe for a change like that.
override func viewDidLoad() {
    ....
    PHPhotoLibrary.shared().register(self)
}

deinit {
    PHPhotoLibrary.shared().unregisterChangeObserver(self)
}

extension GalleryViewController: PHPhotoLibraryChangeObserver {
    func photoLibraryDidChange(_ changeInstance: PHChange) {
        guard let assets = self.media else { return }
        guard let details = changeInstance.changeDetails(for: assets) else { return }

        DispatchQueue.main.async { [weak self] in
            guard let self = self else { return }
            self.media = details.fetchResultAfterChanges
            self.collectionView.reloadData()
        }
    }
}
Everytime the photo library detects a change, we compute what it is and then reload our data. This way it is always fresh.
Next
With this ends our first dive in building a gallery for your iOS app. You can use what you saw and build something that suits your needs better.
In the next article I will show you how to add multiple selection, animations, video indicators and more.
You can find all the code on GitHub too.